In this article I am going to show you how to Migrate Exchange 2013 to Exchange 2016 step by step, I’ll try covering every step as much as I can, I strongly recommend you guys re-checking every step! before performing these steps on your environment!, Don’t hesitate asking questions, consulting with IT expert, even ask me questions I’ll try to answer, in short words, don’t take risk and raise the flag as needed, this project must be performed thoroughly and very professionally, even if you are tangled up with specific task, calm down, relax try to realize what have you missed.
we get much work here so let’s go over my full explanation and prerequisites we should do, get started.
As stated, the environment consists of three Domain Controllers bases 2012R2 operating system and standalone Exchange 2013 based 2016 operation system which holds CAS, HUB and MAILBOXES roles.
Note: Prepare a project documentation with regards to your mail server infrastructures, likewise, Mailboxes capacities, DB sizes, SMTP routing, Certificate, Public Folder, IIS, Auto Discover, EWS, send and receive connectors, and everything that you should know before initiate the Exchange migration.
What’s new Exchange 2016:
https://www.pelegit.co.il/installing-exchange-2016/
Mailbox role and CAS role combined with Mailbox role.
RPC over HTTP replaced with MAPI OVER HTTP.
Hybrid configuration Wizard upgraded to HCW -office 365 application hybrid support.
Some new conditions and actions added to Exchange 2016.
The eDiscovery upgraded with Public folder support and in-place hold for in place eDisconvery + Compliance Search.
And Microsft improved some enhanced the search which is faster, better reliability with quick failovers,
Pre-Check:
– All Exchange 2013 servers in the organization must have Exchange 2013 Cumulative Update 10 or later installed
– Any domain controllers in the forest must be running Windows Server 2008 or later
– Active Directory Forest Functional level in the organization must be upgraded to Windows Server 2008 R2 or late
Office: Outlook client version supported:
Outlook 2016
Outlook 2013
Outlook 2010 with KB2965295
Outlook for Mac for Office 365
Outlook for Mac 2011
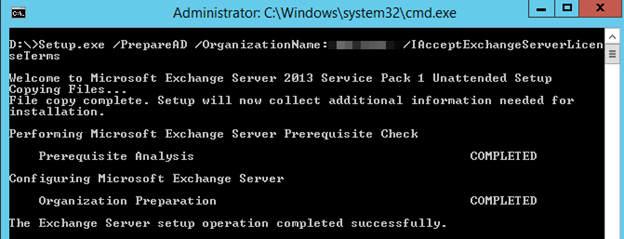
Prepare Active Directory for Exchange 2016:
Copy and extract the Exchange 2016 setup files to Active Directory and start with the following commands:
Pre-requisites on the new Exchange:
Open step files location using CMD:
Setup.exe /PrepareSchema /IAcceptExchangeServerLicenseTerms
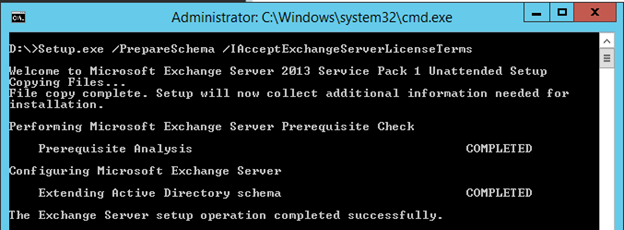
Setup.exe /PrepareAD /OrganizationName:"<organization name>" /IAcceptExchangeServerLicenseTerms
In the new server we should prepare the server with the following configurations:
– Install Net 4.5.2
– Install the Unified Messaging Communications Managed API 4.0 Runtime:
https://www.microsoft.com/en-US/download/confirmation.aspx?id=34992
Install the following Windows Features: > Open Powershell:
Install-WindowsFeature NET-Framework-45-Features, RPC-over-HTTP-proxy, RSAT-Clustering, RSAT-Clustering-CmdInterface, RSAT-Clustering-Mgmt, RSAT-Clustering-PowerShell, Web-Mgmt-Console, WAS-Process-Model, Web-Asp-Net45, Web-Basic-Auth, Web-Client-Auth, Web-Digest-Auth, Web-Dir-Browsing, Web-Dyn-Compression, Web-Http-Errors, Web-Http-Logging, Web-Http-Redirect, Web-Http-Tracing, Web-ISAPI-Ext, Web-ISAPI-Filter, Web-Lgcy-Mgmt-Console, Web-Metabase, Web-Mgmt-Console, Web-Mgmt-Service, Web-Net-Ext45, Web-Request-Monitor, Web-Server, Web-Stat-Compression, Web-Static-Content, Web-Windows-Auth, Web-WMI, Windows-Identity-Foundation, RSAT-ADDS:
– Then, restart the machine.
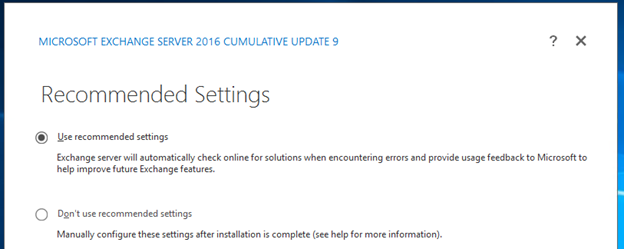
The next step is installing the Exchange Server 2016:
You can check update before initiating Exchange installation:

Use recommended settings:
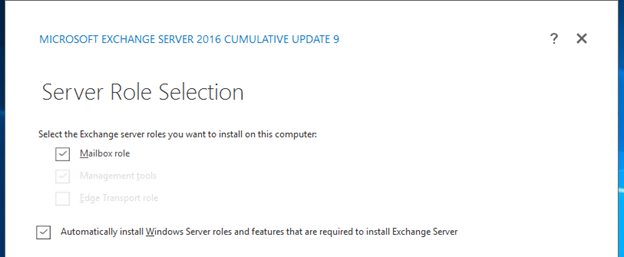
Check the Mailbox Role and “Automatically install Windows Server Roles and Features”:
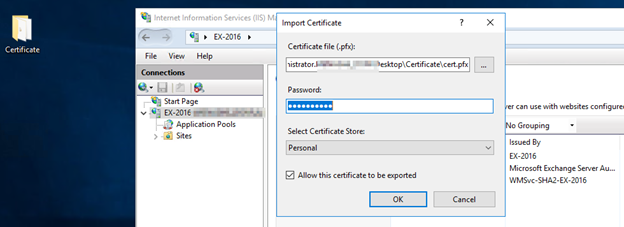
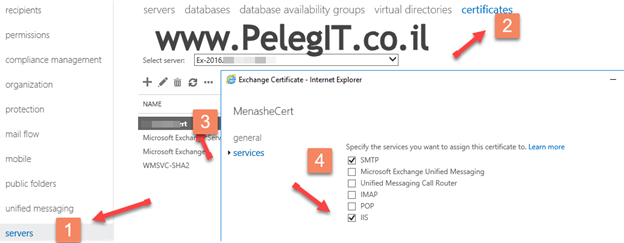
The next step is to take the existing certificate which signed by “COMODO” in my case and importing it to the new server.
Just copy the certificate and import it to the new Exchange into the IIS certificates:
Then, that certificate will be available on Exchange Certificates.
Double click on it and then go to “Services” and choose what services do you want this certificate will be applied.
By default, Exchange installed the first database on the same folder where the Exchange is installed, I want to move it to the different location and change the name of the DB.
Let’s get all Current Exchange’s databases:
Get-MailboxDatabase
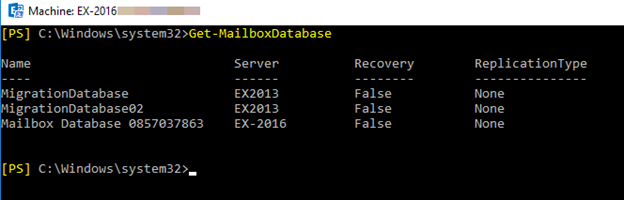
Set a new Name:
Set-MailboxDatabase "Mailbox Database 0857037863" -Name "DB01"
Get Mailboxdatabase again:

Move-DatabasePath:
Move-DatabasePath -Identity "DB01" -EdbFilePath D:\DB01\DB01.edb -LogFolderPath L:\DB01:

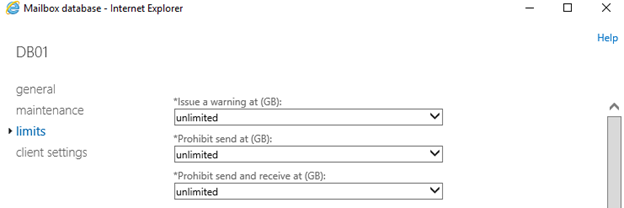
Set database limits settings- you can keep in your previous settings…
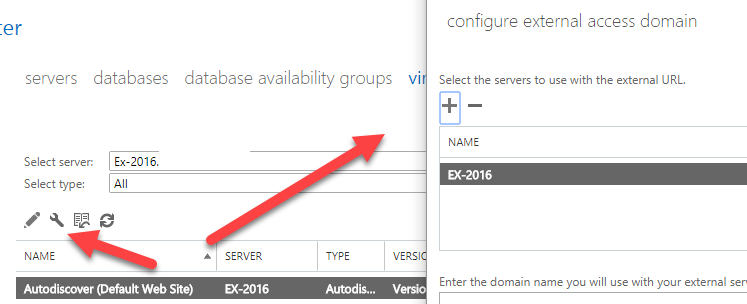
The next step is to change the Exchange Virtual Directories URL’s
Open Exchange Managment Shell and set the Service Connection Point:
$AutodiscoverHostName = "autodiscover.PELEGIT.co.il"
Get-ExchangeServer | Where {($_.AdminDisplayVersion -Like "Version 15.1*") -And ($_.ServerRole -Like "*Mailbox*")} | Set-ClientAccessService -AutoDiscoverServiceInternalUri https://$AutodiscoverHostName/Autodiscover/Autodiscover.xml
Make sure you configure it correctly:
Get-ExchangeServer | Where {($_.AdminDisplayVersion -Like "Version 15.1*") -And ($_.ServerRole -Like "*Mailbox*")} | Get-ClientAccessService | Format-Table Name, AutoDiscoverServiceInternalUri -Auto
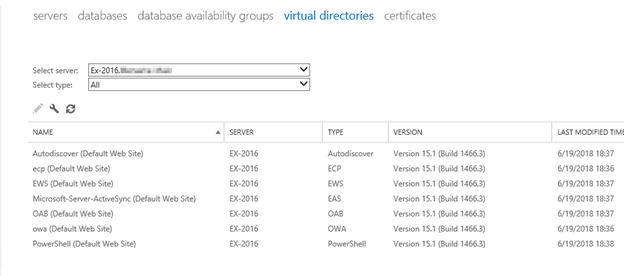
Currently, the Exchange 2013 works with external URL’s so I am going to use on the same URL for Exchange 2016 as well:
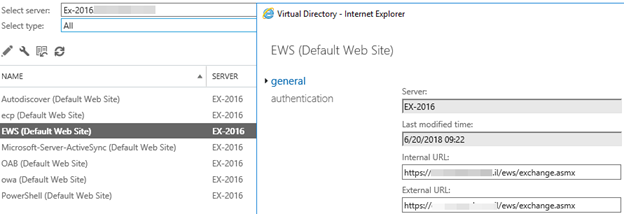
Exchange Web Services:
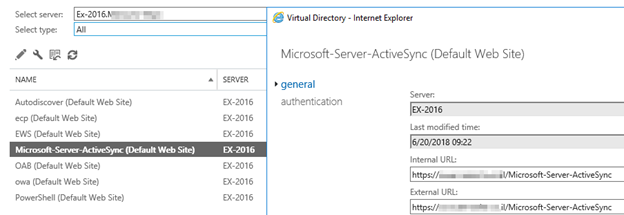
Microsoft-Server-ActiveSync (Default Web Site):
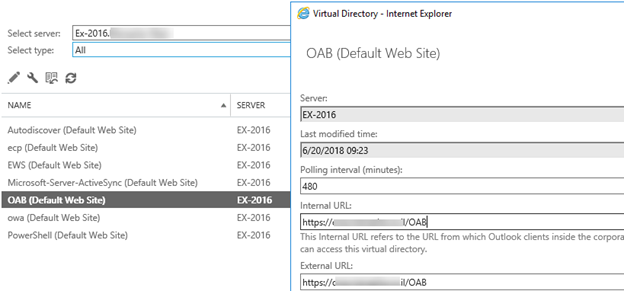
Offline Address Book:
Outlook Web Access:
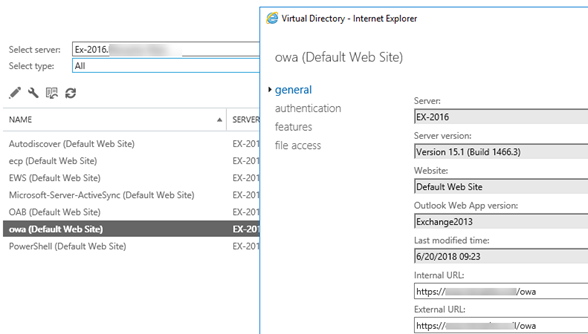
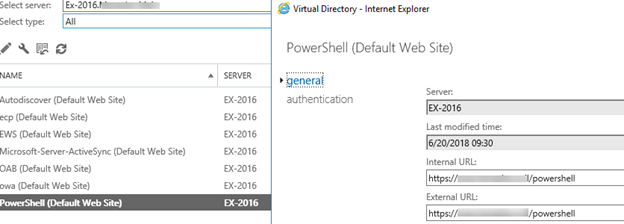
PowerShell:
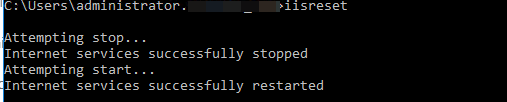
Restart the IIS:
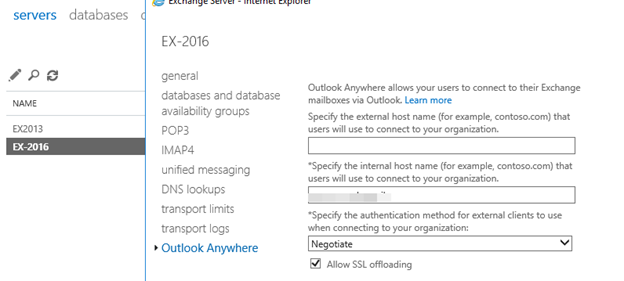
Configure the Outlook Anywhere:
Internal and external HOSTNAME, in my case: Mail.pelegit.co.il
Update MAPI:

Get-MapiVirtualDirectory -Server ex-2016 | Set-MapiVirtualDirectory -InternalUrl https://www.mail.pelegit.co.il/mapi -ExternalUrl https://www.mail.pelegit.co.il/mapi
![]()
The URL which specified above configured as A record in the DNS-world, describing the “mail.pelegit.co.il”, into your Firewall suppose to be “Virtual IP” and rule, for instance, 22.44.22.11 — > points — > 192.168.10.5:433 (Exchange Server 2016) on port 443.
After pointing OWA to Exchange 2016 in the Firewall, what will be happened if the user that exists on Exchange 2013 DB’s authenticated to OWA?
Very simple the Exchange 2016 redirects the request to Exchange 2013 and the user will be authenticated successfully.
So, make sure you have the AutoDiscover record it below:
“AutoDiscover.Pelegit.co.il” which points to your Firewall. And another A record for:
“Mail.Pelegit.co.il” which points to your Firewall, in the firewall you point them using VIP to your Exchange Server.
Into your firewall, you should check that you are allowing HTTPS (443) requests externally to your Exchange server, see example below:
There is virtual IP from external IP to internal (Exchange 2016):
![]()
Make sure there is access from your DMZ (PineApp to two Exchanges):
Now you have to make sure that there is accessing from the WAN to LAN into your Exchange 2016 object and enabling the following Ports:
https://docs.microsoft.com/en-us/exchange/plan-and-deploy/deployment-ref/network-ports
Firewall Rule:
Outcoming interface: WAN
Incoming interface: LAN
From: All
Destination: Exchange VIP
Changing the VIP from Exchange 2013 to Exchange 2016.
What about the MX record?
Basically, you shouldn’t change it, mostly the MX points to Anti Span as it was and into your firewall there’s already allowing ruled from DNZ to your Exchange server and opposite, in a case of sending email through send connector Smart host (HTTP/S, SMTP, DNS, and needed ports).
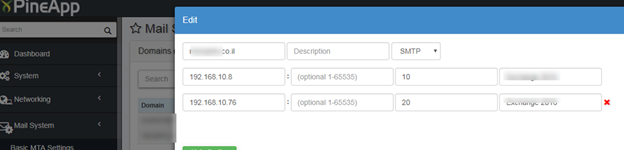
In addition, into your PineApp, already has a relay and local domain which are transferring SMTP to Exchange servers you just have to make the steps I have done below in your PineApp.
![]()
Another point – Currently the Anti-Spam (PineApp) knows to forward SMTP to Exchange 2013, we should Add Exchange 2016 to the routing list as well:
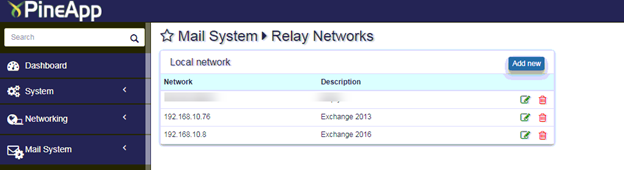
Add new Exchange as Local Domain:
In a case that your internal DNS zone is same as the domain name, you can create A RECORD that points internally to your server or externally:

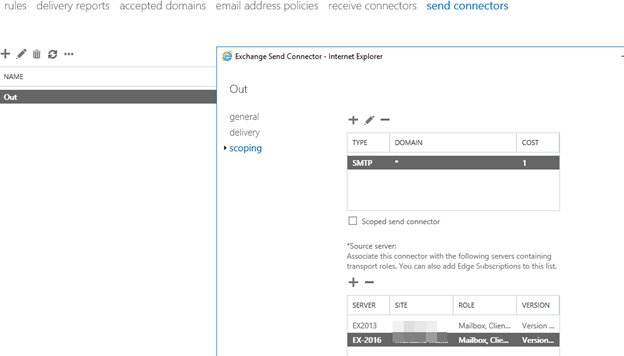
Add the new Exchange server to the “Send Connector”:
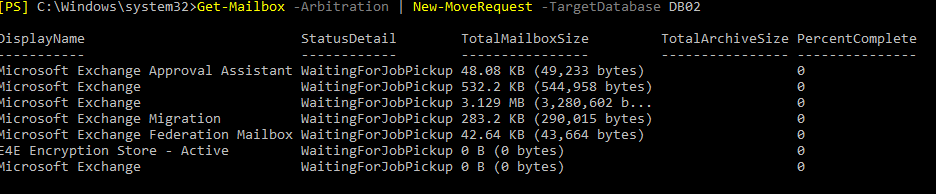
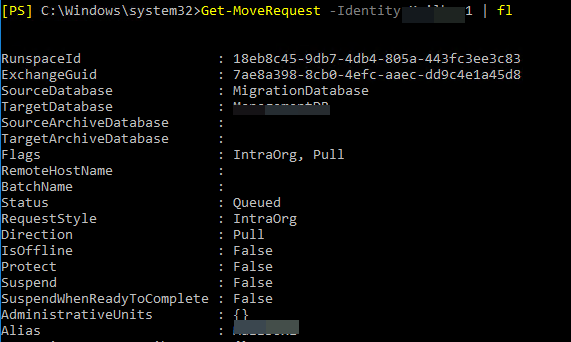
We should move the arbitration mailboxes to the new Exchange databases, as knows the attribution mailboxes are very useful for Exchange, such as migration process, audit, storing system data:
Get-Mailbox -Arbitration | New-MoveRequest -TargetDatabase
Re-checking the Arbitration’s mailboxes location and you can see that they have moved to Ex-2016:

Initiate the mailboxes migration task:
This might be a long task but most important, here we’re starting with mailboxes migration, and moving them from Exchange 2013’s databases to Exchange 2016’s databases, please follow the easy steps:
– Don’t migrate a big bunch of people at once!
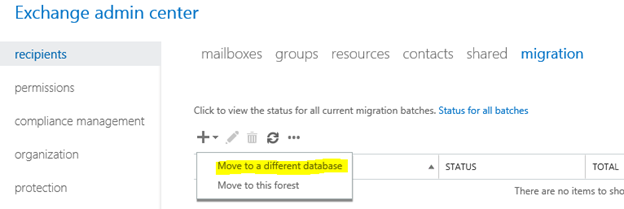
Choose the mailbox, I’m intentionally starting with a single mailbox, post migration we will have to check some test before migrating the entire organization like Mobile connectivity, EWS services, free buys, send & receive OWA login and son on:
Please pay attention to the log’s disk capacity, because during the migration tasks the disk going to be increased extremely.
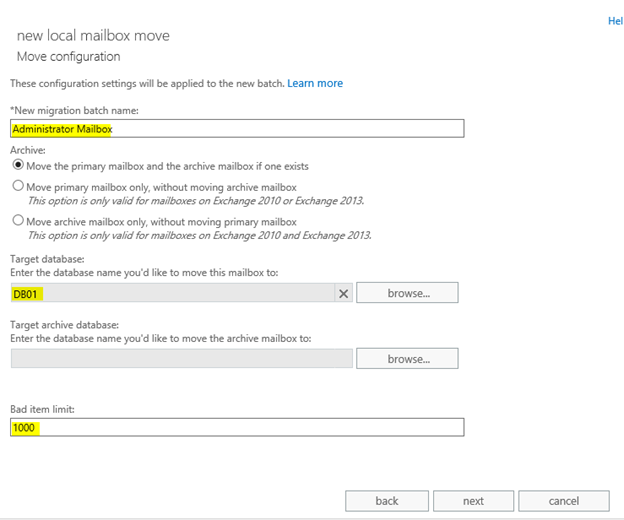
Migration batch name:
Target database “New Exchange database”
Bad Item Limit:1000 (For large mailboxes, set higher):
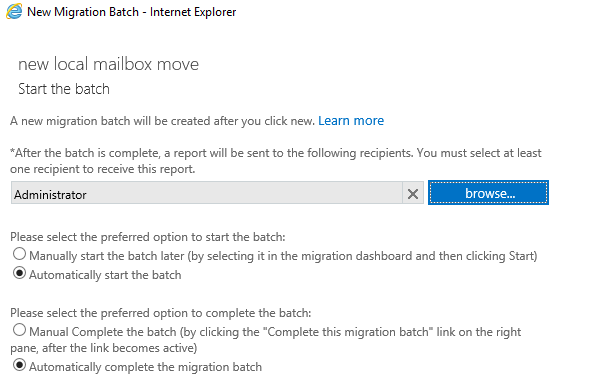
Send the success/failure report to the administrator and automatically complete the batch:
Migration batch starts:
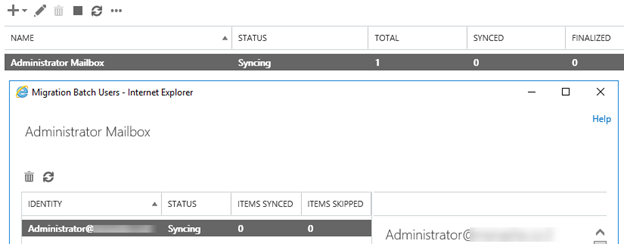
Completed:

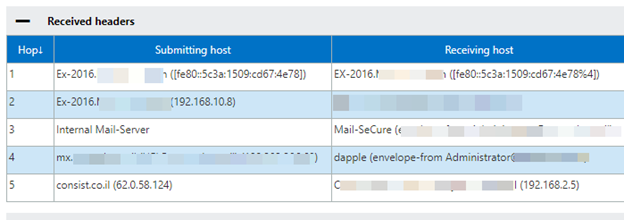
Let’s send a test message internally and externally and look into the headers
Received to my email:
Connect your mobile and test if as well.
Try to access EWS service an make sure Free & Busy works.
As soon as you have finished with all mailboxes migration, we can think about migrating the Public folder from Exchange 2013 to Exchange 2016, let’s see how to complete this task:
Currently, we have an existing public folder on Exchange 2013.
So, let’s see how to migrate public folder from Exchange 2013 to Exchange 2016:
Check what public folders do we have:
Open Exchange Management Shell and run the following command:
Get-ExchangeServer | Where {($_.AdminDisplayVersion -Like "Version 15.0*") -And ($_.ServerRole -Like "*Mailbox*")} | Get-Mailbox -PublicFolder | Get-MailboxStatistics | Format-Table DisplayName, TotalItemSize, ServerName
Move any existing Public folders on EX2013 to Exchange 2016:
Get-Mailbox -PublicFolder -Server Ex2013 | New-MoveRequest -TargetDatabase destinationDP (on Exchange 2016):

Get status:
Ensure it’s has migrated successfully:
Get-Mailbox -PublicFolder | Get-MailboxStatistics | Format-Table DisplayName, TotalItemSize, ServerName
Migrated successfully:

Copy Receive connectors settings, just open both simultaneously [EX13 against EX 16] comparing between settings, that’s for you won’t have a headache.
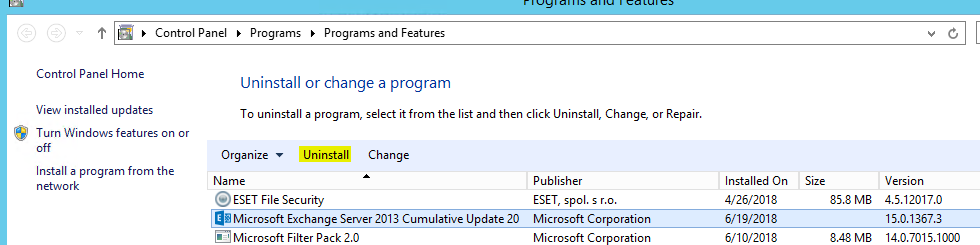
The last task is decommissioning the Exchange 2013 which should be straightforward if you have completed all task correctly:
1) Remove any old databases that belonged to Exchange 2013, make sure there is no data!.
Know we have to remove the old Exchange 2013, just go to the old server and open the “Appwiz.cpl” and uninstalling the Exchange 2013:
- – If there is existing data on Exchange 2013 you’ll get a warning about it
Don’t forget, remove the old records, data in your firewall Anti-Spam, DNS and so on, just prevent from leaving leftovers.